워드프레스에서 사이드바나 페이지/포스트 본문 또는 본문 내의 특정 위치에 이미지를 랜덤하게 표시하고 싶은 경우가 있습니다. 이 상황에서 워드프레스 랜덤 플러그인 Hot Random Image를 사용할 수 있습니다.
워드프레스 랜덤 이미지 플러그인 - Hot Random Image
Hot Random Image 플러그인을 사용하면 기본적으로 사이드바 등의 위젯 영역에 이미지를 랜덤하게 표시할 수 있습니다.
워드프레스 포스트나 페이지에 랜덤 이미지를 표시하고 싶은 경우에는 숏코드를 사용할 수 있습니다. 모든 페이지/글이나 카테고리 페이지 등의 특정 위치에 이미지를 랜덤하게 표시하고 싶은 경우에는 Ad Inserter를 사용하여 숏코드를 입력할 수 있습니다.
사이드바에 랜덤 이미지 표시하기
이 플러그은 기본적으로 사이드바나 푸터 등 위젯 영역에 랜덤 이미지를 표시할 수 있습니다. 워드프레스 관리자 페이지 » 외모 » 위젯으로 이동하여 원하는 위젯 영역(예: Right Sidebar)에 Hot Random Image 블록을 삽입할 수 있습니다.
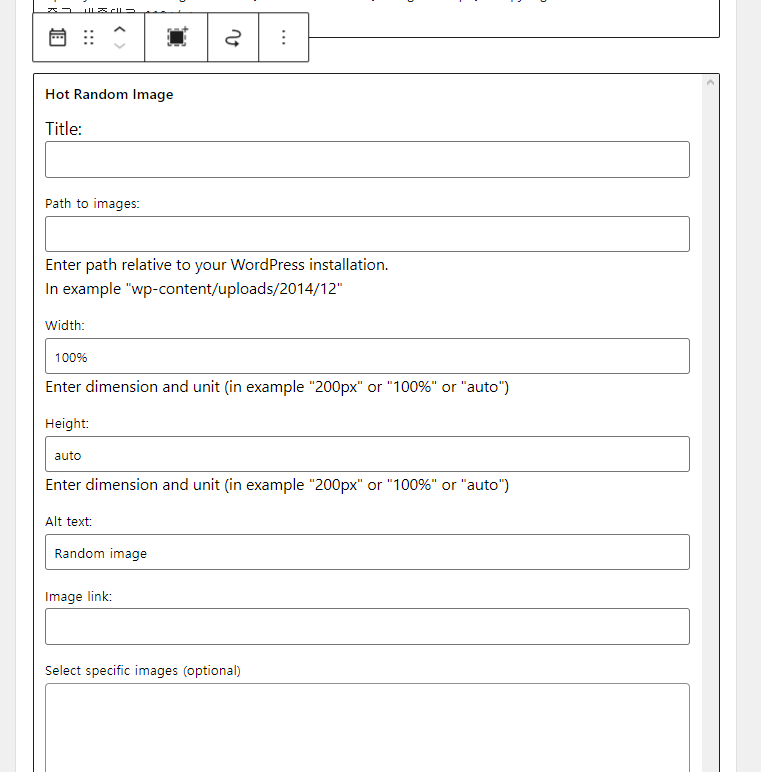
Hot Random Image 블록을 추가하면 위와 같은 화면이 표시됩니다.
- Title: 제목
- Path to images: 이미지 경로
- Width: 이미지 폭
- Height: 높이. 보통 auto(자동)로 두도록 합니다.
- Alt text: 대체 텍스트. 이미지 SEO를 위해 지정할 수 있습니다.
- Image link: 이미지 링크
위에서 중요한 것이 이미지 경로(Path to images)입니다.
Enter path relative to your WordPress installation.
In example "wp-content/uploads/2014/12"
이미지 경로를 워드프레스가 설치된 디렉터리의 상대 경로로 입력합니다. 예를 들어, wp-content/uploads/2014/12와 같이 입력할 수 있습니다. 또는, 워드프레스가 설치된 경로 아래에 images/random 폴더를 만들어서 이미지들을 넣을 수도 있습니다. 이 경우 이미지 경로는 images/random이 됩니다.
이미지 링크에 URL을 지정하면 랜덤하게 표시되는 이미지에 링크로 지정됩니다. 모든 이미지에 대하여 동일한 링크가 지정되며 개별적으로 링크를 지정할 수는 없습니다. 개별적으로 링크를 지정하고 싶은 경우에는 자바스크립트를 사용하여 링크를 변경할 수 있습니다.
예:
<script>
// select all <a> tags containing <img> tags
var anchors = document.querySelectorAll('a img');

// iterate over each <a> tag
for (var i = 0; i < anchors.length; i++) {
  // if the <img> tag's src matches the desired URL
  if (anchors[i].src === "https://example.com/images/random/2.jpg") {
    // change the href of the parent <a> tag
    anchors[i].parentNode.href = "https://naver.com/";
  }
}
</script>
위와 같은 자바스크립트 코드를 사용하면 images/radom 폴더 내의 2.jpg가 로드되면 타겟 링크가 https://naver.com으로 설정됩니다.
여러 개의 파일에 각기 다른 링크를 걸어야 하는 경우에는 다음과 같은 코드로 시도해볼 수 있습니다.
<script>
// create a map of image sources to URLs
var urlMap = {
  "https://example.com/images/random/2.jpg": "https://naver.com/",
  "https://example.com/images/random/3.jpg": "https://google.co.kr"
  // add more mappings as necessary
};

// select all <a> tags containing <img> tags
var anchors = document.querySelectorAll('a img');

// iterate over each <a> tag
for (var i = 0; i < anchors.length; i++) {
  // if the <img> tag's src is in the urlMap
  if (urlMap.hasOwnProperty(anchors[i].src)) {
    // change the href of the parent <a> tag to the corresponding URL
    anchors[i].parentNode.href = urlMap[anchors[i].src];
  }
}
</script>
이미지 개수에 따라 이미지 URL과 타겟 링크 URL을 추가할 수 있습니다.
숏코드로 랜덤 이미지 표시하기
Hot Random Image 플러그인은 숏코드를 지원합니다. 다음과 같은 쇼트코드를 원하는 곳에 붙여넣기 할 수 있습니다.
[randomimage path="images/random" width="100%" height="auto" alt="Random image" link="https://google.com/"]path는 이미지 경로이고 alt는 대체 텍스트입니다. 그리고 link에는 이미지를 클릭할 때 이동할 URL을 입력합니다. Width에는 이미지 폭을 300px, 100%, auto 등과 같은 형식으로 지정할 수 있습니다.
마찬가지로 모든 이미지에 동일한 링크가 지정되므로, 이미지마다 다른 링크를 지정하고 싶은 경우에는 상기에 제시된 JavaScript를 활용할 수 있습니다.
Ad Inserter를 사용하면 특정 위치(예: 포스트 내의 첫 번째 문단 아래 혹은 첫 번째 문단 위)에 일괄적으로 랜덤 이미지를 표시할 수 있습니다.
플러그인을 사용하지 않고 랜덤 이미지 표시하기
플러그인을 사용하지 않고 랜덤하게 이미지를 표시하고 싶은 경우 자바스크립트를 활용할 수 있습니다.
예시:
<script>
document.addEventListener("DOMContentLoaded", function() {
  // Array of image URLs and corresponding link URLs
  var imagesAndLinks = [
    {
      imageUrl: "https://example.com/images/random/1.jpg",
      linkUrl: "https://google.com"
    },
    {
      imageUrl: "https://example.com/images/random/2.jpg",
      linkUrl: "https://naver.com"
    },
    {
      imageUrl: "https://example.com/images/random/3.jpg.jpg",
      linkUrl: "https://google.co.kr"
    }
  ];

  // Get a random index
  var randomIndex = Math.floor(Math.random() * imagesAndLinks.length);

  // Get the image URL and link URL from the array
  var imageUrl = imagesAndLinks[randomIndex].imageUrl;
  var linkUrl = imagesAndLinks[randomIndex].linkUrl;

  // Generate the HTML img tag with a CSS class
  var img = document.createElement('img');
  img.src = imageUrl;
  img.className = "random-img";
  img.alt = "Some alt text";

  // Generate the HTML a tag and wrap it around the img tag
  var a = document.createElement('a');
  a.href = linkUrl;
  a.appendChild(img);

  // Find the placeholder element and replace it with the a tag
  var placeholder = document.getElementById('image-placeholder');
  placeholder.parentNode.replaceChild(a, placeholder);
});


</script>
랜덤 이미지를 표시하려는 곳에는 다음과 같은 HTML 코드를 추가합니다.
<div id="image-placeholder"></div>블록 에디터(구텐베르크)를 사용하는 경우 "사용자 정의 HTML" 블록으로 위의 코드를 넣을 수 있습니다. 엘리멘터 페이지 빌더에서는 HTML 위젯을 사용할 수 있습니다.
자바스크립트 로드하기
자바스크립트는 다음 글을 참고하여 로드할 수 있습니다.
위의 방법이 복잡하거나 귀찮은 경우 (그리 바람직하지는 않지만) WPCode와 같은 플러그인을 사용하여 푸터 영역에 추가할 수 있습니다.
GeneratePress 테마를 사용하는 경우 훅(Hook)으로 자스 코드를 추가할 수 있습니다.

댓글 남기기