엘리멘터 프로의 포스트 위젯을 사용하여 글이나 커스텀 포스트 타입 글들을 전체 또는 카테고리별로 리스트 형식이나 그리드 형식으로 표시할 수 있습니다. 포스트 리스트에서 썸네일을 클릭하면 해당 글로 이동하게 됩니다. Elementor의 사이트 설정에서 라이트 박스 기능을 활성화할 수 있지만, 해당 이미지 URL로 링크가 설정된 경우에만 작동합니다.
엘리멘터 Posts 위젯으로 최신 글이나 카테고리 글들을 표시할 때, 썸네일(특성 이미지)을 클릭하면 라이트박스 이미지로 표시되도록 하고 싶은 경우 아래에 설정한 방법으로 시도할 수 있습니다.
엘리멘터 포스트 위젯: 이미지를 라이트박스로 표시하기
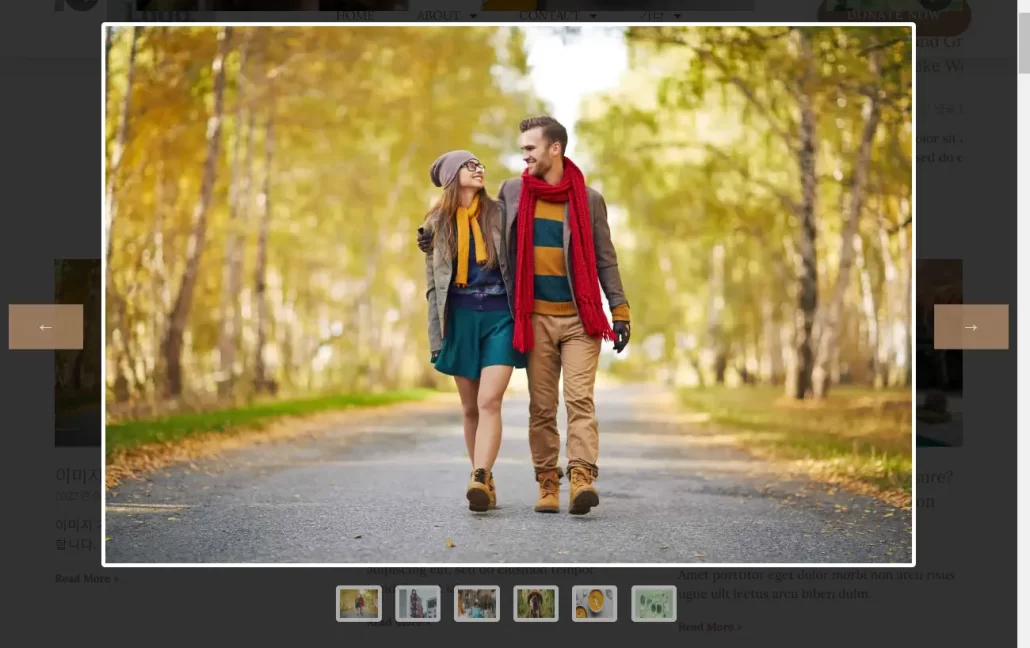
상기 동영상과 같이 엘리멘터 페이지 빌더의 Posts 위젯으로 표시한 포스트 목록에서 썸네일을 클릭하면 라이트박스 이미지로 표시되고, 라이트박스 내의 썸네일 아이콘을 클릭하면 해당 이미지가 표시되도록 하는 방법에 대하여 살펴보겠습니다.
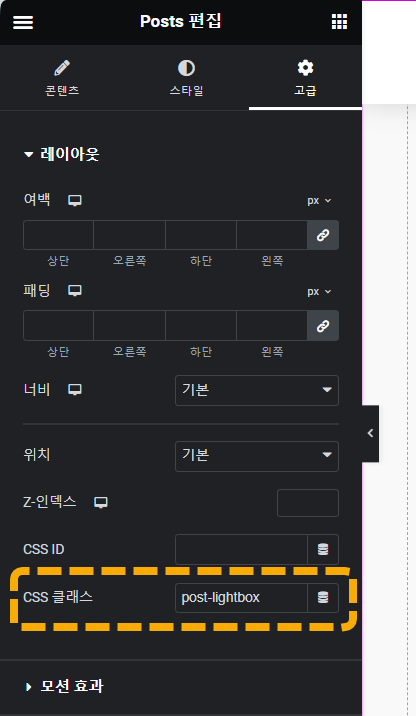
- 먼저 Posts 위젯의 편집 패널에서 고급(Advanced) 탭을 클릭한 다음, CSS 클래스에 post-lightbox를 지정합니다.
- 해당 페이지에서 HTML 위젯을 추가한 다음, 다음 HTML 코드를 추가합니다.
<div id="lightbox">
<img id="lightbox-img" src="">
<div id="lightbox-thumbnails"></div>
<button id="lightbox-prev" class="lightbox-arrow">←</button>
<button id="lightbox-next" class="lightbox-arrow">→</button>
</div>- 고급 탭에서 하단의 Custom CSS 섹션에 아래의 CSS 코드를 추가합니다.
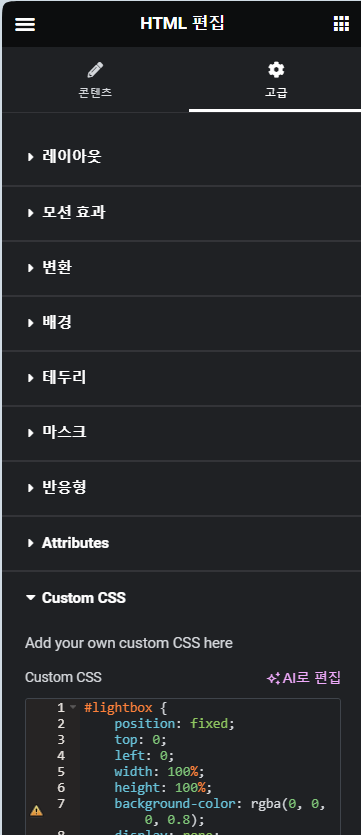
추가할 CSS 코드:
#lightbox {
    position: fixed;
    top: 0;
    left: 0;
    width: 100%;
    height: 100%;
    background-color: rgba(0, 0, 0, 0.8);
    display: none;
    align-items: center;
    justify-content: center;
    z-index: 9999;
    flex-direction: column;
}

#lightbox img {
    max-width: 80%;
    max-height: 80%;
    border: 5px solid white;
    border-radius: 4px;
}

#lightbox-thumbnails {
    display: flex;
    margin-top: 20px;
}

#lightbox-thumbnails img {
    width: 50px;
    height: 50px; /* Making it square */
    margin: 0 5px;
    cursor: pointer;
    opacity: 0.6;
    transition: opacity 0.3s;
}

#lightbox-thumbnails img:hover {
    opacity: 1;
}

#lightbox:target {
    display: flex;
}

.lightbox-arrow {
    position: absolute;
    top: 50%;
    transform: translateY(-50%);
    background-color: rgba(0, 0, 0, 0.7);
    color: white;
    border: none;
    font-size: 24px;
    cursor: pointer;
    padding: 10px 15px;
    border-radius: 50%;
    z-index: 10;
    opacity: 0.8;
    transition: opacity 0.2s;
}

.lightbox-arrow:hover {
    opacity: 1;
}

#lightbox-prev {
    left: 10px;
}

#lightbox-next {
    right: 10px;
}


#lightbox-img {
    cursor: pointer;
}- 아래의 자바스크립트 코드를 추가합니다.
/**
 * Lightbox Enhancement for Elementor Posts Widget:
 *
 * 1. Activates a lightbox when post thumbnails are clicked within the ".post-lightbox" container.
 * 2. The lightbox displays the largest available version of the post's featured image.
 * 3. Thumbnails of all posts are shown at the bottom of the lightbox for navigation.
 * 4. Clicking on any thumbnail in the lightbox will display the corresponding post's featured image.
 * 5. Clicking on the large featured image in the lightbox will redirect to the corresponding post.
 * 6. Previous and next arrow buttons are provided in the lightbox for image navigation.
 *
 * Designed to enhance the viewing experience of Elementor's Posts widget by providing a
 * fullscreen view of post images without leaving the current page, and easy navigation
 * between post images.
 *
 * Note: This script assumes the Elementor widget structure and class naming conventions remain consistent.
 *
 * Elementor Pro의 포스트 위젯 이미지 라이트박스:
 *
 * 1. ".post-lightbox" 컨테이너 내의 포스트 썸네일을 클릭하면 라이트박스가 활성화됩니다.
 * 2. 라이트박스는 포스트의 특징 이미지 중 가장 큰 버전을 표시합니다.
 * 3. 라이트박스 하단에 모든 포스트의 썸네일이 내비게이션을 위해 표시됩니다.
 * 4. 라이트박스 내의 어떤 썸네일을 클릭하면 해당 포스트의 특징 이미지가 표시됩니다.
 * 5. 라이트박스 내의 큰 특징 이미지를 클릭하면 해당 포스트로 리디렉션됩니다.
 * 6. 이미지 내비게이션을 위해 라이트박스에 이전 및 다음 화살표 버튼이 제공됩니다.
 *
 * 현재 페이지를 벗어나지 않고 포스트 이미지의 전체 화면 보기를 제공하고,
 * 포스트 이미지 간의 쉬운 내비게이션을 통해 Elementor의 포스트 위젯의 시청 경험을 향상시키도록 설계되었습니다.
 *
 * 참고: 이 스크립트는 Elementor 위젯 구조와 클래스 명명 규칙이 일관되게 유지된다고 가정합니다.
 */

document.addEventListener("DOMContentLoaded", function() {
    // Variables
    var lightbox = document.getElementById('lightbox');
    var lightboxImg = document.getElementById('lightbox-img');
    var thumbnailsContainer = document.getElementById('lightbox-thumbnails');
    var prevButton = document.getElementById('lightbox-prev');
    var nextButton = document.getElementById('lightbox-next');
    var currentPostURL = '';

    var thumbnails = document.querySelectorAll('.post-lightbox .elementor-post__thumbnail__link');
    var currentIndex = 0; // This will keep track of the current displayed image in the lightbox

    // Show the largest image in the lightbox when clicking on a thumbnail
    thumbnails.forEach(function(thumbnail, index) {
        thumbnail.addEventListener('click', function(e) {
            e.preventDefault();

            var images = thumbnail.querySelector('img').getAttribute('srcset').split(',').map(function(item) {
                var parts = item.trim().split(' ');
                return {
                    url: parts[0],
                    width: parseInt(parts[1], 10)
                };
            });

            images.sort(function(a, b) {
                return b.width - a.width;
            });

            var largestImageSrc = images[0].url;

            lightboxImg.src = largestImageSrc;
            currentPostURL = thumbnail.href; // Store the post's URL
            lightbox.style.display = 'flex'; // Show the lightbox

            currentIndex = index; // Update the current index
        });

        // Create a thumbnail icon for each post
        var imgSrc = thumbnail.querySelector('img').getAttribute('src');
        var icon = document.createElement('img');
        icon.src = imgSrc;
        icon.style.width = '50px';
        icon.style.height = '50px'; // Square thumbnail icons
        icon.style.marginRight = '10px';
        icon.classList.add('thumbnail-icon');
        thumbnailsContainer.appendChild(icon); // Append to the thumbnails container

        icon.addEventListener('click', function(e) {
            e.stopPropagation(); // Prevent the lightbox from closing

            // Update the main lightbox image when clicking on a thumbnail icon
            var images = thumbnails[index].querySelector('img').getAttribute('srcset').split(',').map(function(item) {
                var parts = item.trim().split(' ');
                return {
                    url: parts[0],
                    width: parseInt(parts[1], 10)
                };
            });

            images.sort(function(a, b) {
                return b.width - a.width;
            });

            lightboxImg.src = images[0].url;
            currentPostURL = thumbnails[index].href; // Store the post's URL
            currentIndex = index; // Update the current index
        });
    });

    // Navigate to the previous image when clicking on the prev button
    prevButton.addEventListener('click', function(e) {
        e.stopPropagation();
        currentIndex = (currentIndex - 1 + thumbnails.length) % thumbnails.length;
        displayImage(currentIndex);
    });

    // Navigate to the next image when clicking on the next button
    nextButton.addEventListener('click', function(e) {
        e.stopPropagation();
        currentIndex = (currentIndex + 1) % thumbnails.length;
        displayImage(currentIndex);
    });

    // A helper function to display an image in the lightbox given its index
    function displayImage(index) {
        var thumbnail = thumbnails[index];
        var images = thumbnail.querySelector('img').getAttribute('srcset').split(',').map(function(item) {
            var parts = item.trim().split(' ');
            return {
                url: parts[0],
                width: parseInt(parts[1], 10)
            };
        });

        images.sort(function(a, b) {
            return b.width - a.width;
        });

        lightboxImg.src = images[0].url;
        currentPostURL = thumbnail.href; // Update the post's URL
    }

    // Close the lightbox when clicking anywhere inside it, except on the main image
    lightbox.addEventListener('click', function() {
        lightbox.style.display = 'none';
    });

    // Redirect to the post when clicking on the main lightbox image
    lightboxImg.addEventListener('click', function(e) {
        e.stopPropagation(); // Prevent the lightbox from closing
        window.location.href = currentPostURL; // Navigate to the post
    });
});
자바스크립트를 추가하는 방법은 다양합니다. 이 글을 참고하여 JavaScript 코드를 로드하는 것이 바랍니다. 쉬운 방법으로 WPCode와 같은 Header & Footer 플러그인을 설치하고 푸터 영역에 상기 코드(<script>...</script> 추가)를 추가할 수 있습니다.
이제 Posts 위젯의 포스트 리스트에서 썸네일을 클릭하면 아래와 같이 팝업으로 이미지가 전체 화면으로 표시될 것입니다. 페이지네이션을 표시할 경우에도 해당 페이지에서 잘 작동합니다.
마치며
이상으로 엘리멘터 글 목록에서 썸네일을 클릭할 경우 라이트박스로 표시되도록 하는 방법에 대하여 살펴보았습니다. 다음에 기회가 될 때 포스트 위젯을 포스트 슬라이더로 바꾸는 방법에 대하여 설명해보겠습니다.
✅ 엘리멘터 사용법

댓글 남기기