워드프레스에서 테마의 기능보다는 엘리멘터 페이지 빌더의 기능에 주로 의존하면서 사이트를 제작하고 싶은 경우 Hello Elementor 테마를 사용할 수 있습니다. 엘리멘터 프로를 사용하는 경우 깡통 테마라 할 수 있는 Hello Elementor를 사용하면 엘리멘터의 기능만으로 사이트 제작이 가능합니다.
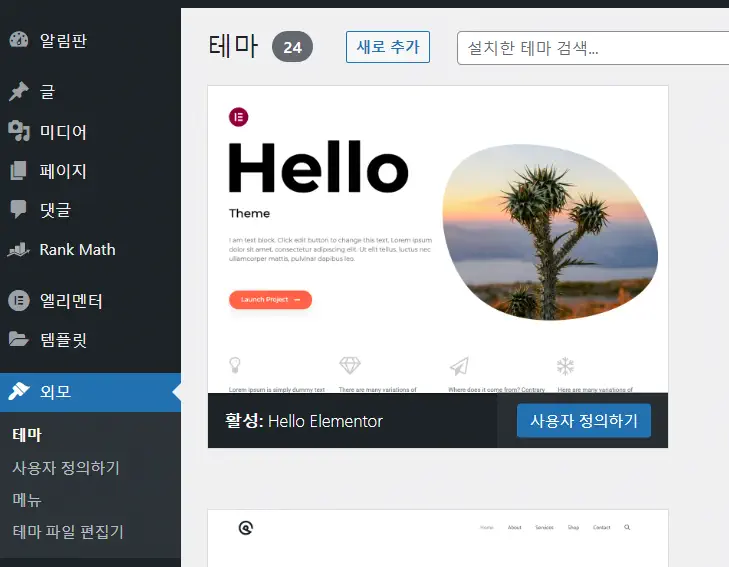
Hello Elementor를 활성화하면 외모 » 위젯 메뉴가 표시되지 않습니다. 사이드바 위젯을 추가하고 싶은 경우 엘리멘터의 테마 빌더에서 템플릿을 만들어 직접 사이드바를 만들 수 있습니다. 또한, 차일드 테마를 만들고 위젯 영역을 만드는 코드를 추가하여 사이드바를 만들 수 있습니다. 이런 사이드바를 마찬가지로 템플릿에서 불러올 수 있습니다.
워드프레스 Hello Elementor 테마: 사이드바 위젯 추가하기
위젯 메뉴가 없는 경우
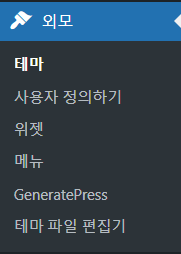
일반적인 워드프레스 사이트에서는 외모 메뉴 아래에 테마, 사용자 정의하기, 메뉴, 위젯 등의 하위 메뉴가 있습니다.
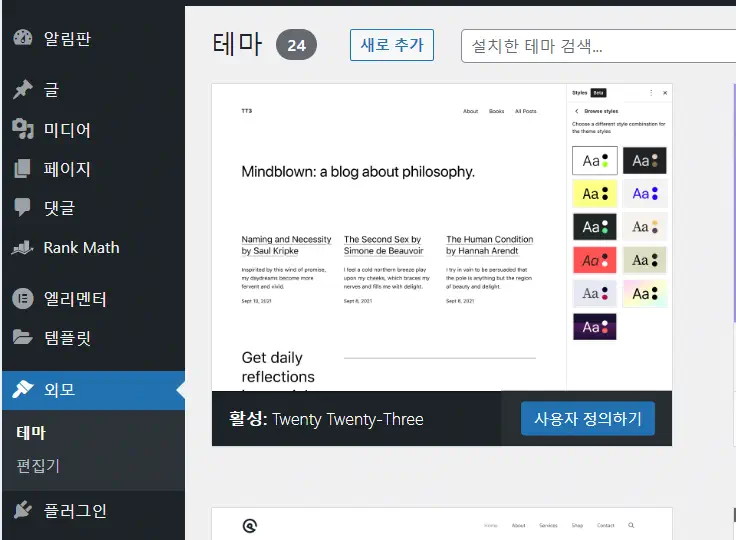
하지만 블록 테마나 Hello Elementor 등 일부 테마에서는 외모 » 위젯이 표시되지 않습니다.
Twenty Twenty-Three 등 블록 테마의 경우 외모 아래에 테마와 편집기 하위 메뉴만 표시되고, 사용자 정의하기, 위젯, 메뉴 등의 하위 메뉴는 표시되지 않습니다.
Hello Elementor 테마에서는 위젯이 표시되지 않습니다.
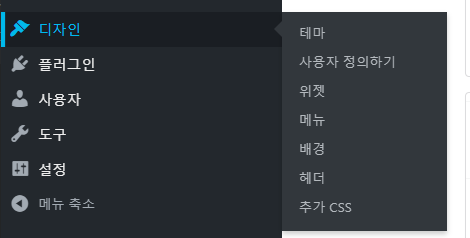
참고로 워드프레스닷컴(WordPress.com)에서는 외모 대신 "디자인"이라는 용어가 한국어 버전에서 사용됩니다.
Elementor Hello 테마에서 사이드바 위젯 추가하기
Hello 테마에서 사이드바 위젯을 추가하고 싶은 경우 차일드 테마는 생성하고 함수 파일에 위젯 등록 코드를 추가할 수 있습니다. 그러면 외모 아래에 위젯 하위 메뉴가 활성화되어 위젯을 추가할 수 있습니다. 위젯 영역은 개별 페이지뿐만 아니라 싱글 포스트(블로그 페이지), 싱글 페이지, 아카이브(카테고리 등) 등의 템플릿에서 로드할 수 있습니다.
Hello Elementor 차일드 테마 설치하기
Hello 차일드 테마는 https://github.com/elementor/hello-theme-child에서 다운로드할 수 있습니다. 다운로드하는 데 어려움을 겪는 경우 네이버 카페에서 Hello Elementor 자식 테마를 다운로드할 수 있습니다.
차일드 테마 파일을 다운로드하였다면 업로드 방식으로 테마를 설치할 수 있습니다. 워드프레스 관리자 페이지 » 외모 » 테마로 이동한 다음, 새로 추가 버튼을 클릭하여 다운로드한 차일드 테마 파일을 업로드하여 설치하고 활성화합니다.
사이드바 등록하기
Hello 차일드 테마가 설치되었다면 FTP로 접속하여 차일드 테마 폴더(예: /wp-content/themes/hello-theme-child-master)로 이동합니다.
functions.php 파일을 열고 다음 코드를 추가합니다.
if (function_exists("register_sidebar")) {
  register_sidebar();
}
상기 코드는 엘리멘터에서 제시하는 위젯 등록 코드입니다. 위의 코드를 추가하면 디버그 모드에서 다음과 같은 경고가 표시됩니다.
Notice: Function register_sidebar was called incorrectly. No id was set in the arguments array for the "Sidebar 1" sidebar. Defaulting to "sidebar-1". Manually set the id to "sidebar-1" to silence this notice and keep existing sidebar content. Please see Debugging in WordPress for more information. (This message was added in version 4.2.0.) in /public_html/wp-includes/functions.php on line 5865

Notice: 함수 register_sidebar이(가) 바르지 않게 호출됐습니다. “사이드바 1” 사이드바에 대한 인자 배열에 id을(를) 설정하지 않았습니다. 기본 값은 “sidebar-1”입니다. 이 알림을 무시하고 사이드바 콘텐츠를 유지하려면 id에 “sidebar-1”을 직접 설정하세요. 더 자세한 정보는 워드프레스 디버깅하기를 보세요. (이 메세지는 버전 4.2.0에서 추가되었습니다.) in /public_html/wp-includes/functions.php on line 5865
위의 경고는 무시할 수 있지만, 이 경고가 표시되지 않도록 하고 싶은 경우 상기 위젯 등록 코드 대신 다음과 같은 코드를 추가할 수 있습니다.
if (function_exists('register_sidebar')) {
    register_sidebar(array(
        'id'            => 'unique-sidebar-id', // Unique ID for your sidebar
        'name'          => __('Sidebar Name', 'textdomain'), // Visible name for your sidebar
        'description'   => __('Description for your sidebar.', 'textdomain'), // Description of your sidebar
        'before_widget' => '<li id="%1$s" class="widget %2$s">', // HTML to use before each widget
        'after_widget'  => '</li>', // HTML to use after each widget
        'before_title'  => '<h2 class="widgettitle">', // HTML to use before each widget title
        'after_title'   => '</h2>', // HTML to use after each widget title
    ));
}
이제 외모 » 위젯 메뉴가 표시되고 사이드바 영역에 위젯을 추가할 수 있습니다.
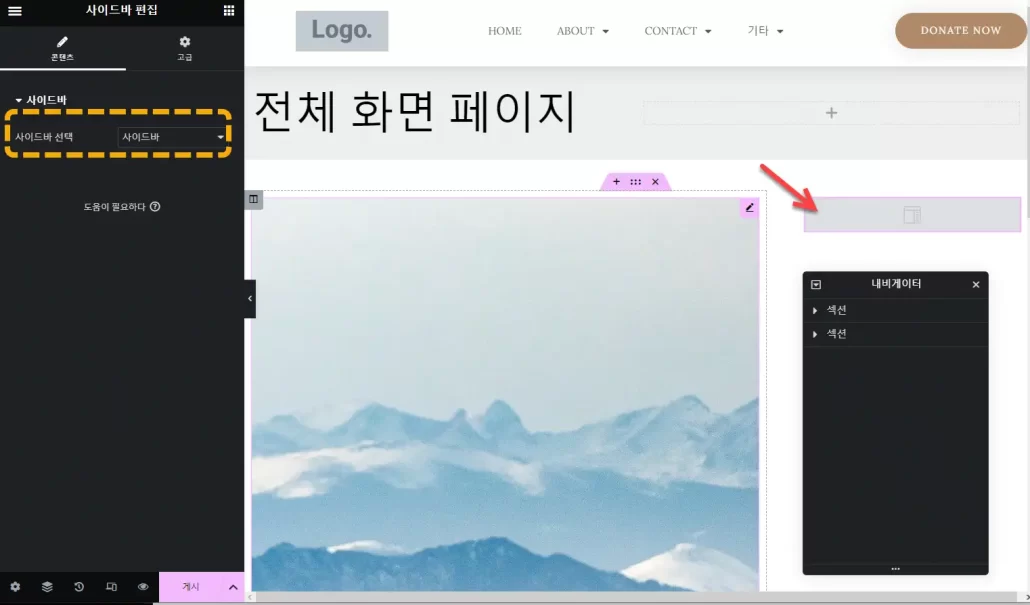
엘리멘터 편집 화면에서 사이드바 엘리먼트를 원하는 곳에 배치하고 사이드바 위젯을 지정할 수 있습니다. 예를 들어, 단일 페이지에서 2 컬럼으로 구성하고 오른쪽에 사이드바를 추가할 수 있습니다.
아래는 Elementor Pro의 테마 빌더에서 싱글 페이지(Single Page) 템플릿을 생성하고 싱글 페이지 블록을 불러온 다음, 커스텀 사이드바를 지정하는 것을 보여주고 있습니다.
사이드바 스타일은 CSS를 사용하여 조정할 수 있습니다. 예시:
.elementor-widget-container > li {
    list-style-type: none;
}

.widget li {
    color: #333; /* Dark grey text color */
    font-size: 16px; /* Font size */
    line-height: 1.5; /* Spacing between lines of text */
    padding-left: 30px; /* Space before the text to allow for custom bullet */
    position: relative; /* Allows us to position the custom bullet */
    margin-bottom: 10px; /* Space between list items */
}

.widget li:before {
    content: ""; /* This is necessary for the pseudo-element to work */
    position: absolute; /* Positions the bullet relative to the list item */
    left: 0; /* Positions the bullet at the start of the text */
    top: 50%; /* Centers the bullet with the text */
    width: 6px; /* Width of the custom bullet */
    height: 6px; /* Height of the custom bullet */
    margin-top: -3px; /* Half of the height to center the bullet */
    background: #333; /* Color of the bullet */
    border-radius: 50%; /* Makes the bullet circular */
}

.widget li:hover {
    color: #0073aa; /* Change text color on hover */
}

.widget li:hover:before {
    background: #0073aa; /* Change bullet color on hover */
}
댓글 남기기