
워드프레스 알림판에 옵션 페이지 추가하기 (사용자 필드 추가)
워드프레스 알림판에 새로운 옵션 페이지를 추가하고 싶은 경우가 있습니다. 예를 들어, 헤더나 푸터에 특정 문구를 코드를 사용하여 테마 파일에 직접 추가한 경우 추후에 고객이 해당 문구를 쉽게 바꿀 수 있도록 알림판에 옵션 페이지를 추가하면 편리할 수 있습니다.
워드프레스 알림판에 옵션 페이지 추가하기
워드프레스 관리자 페이지에 옵션 페이지를 추가하는 방법은 워드프레스 Codex 문서에 잘 설명되어 있습니다.
설명이 매우 장황한데요. 최종적으로 두 개의 필드를 추가하는 방법을 설명하고 있습니다. 종합적인 코드가 https://gist.github.com/vishalkakadiya/735691e184255cd285725c3474109008 문서에도 나와 있습니다. 이 문서에서는 Codex 문서에서 제시하는 코드의 내용을 그대로 여기에 복사했습니다.
class MySettingsPage
{
    /**
     * Holds the values to be used in the fields callbacks
     */
    private $options;

    /**
     * Start up; 시작
     */
    public function __construct()
    {
        add_action( 'admin_menu', array( $this, 'add_plugin_page' ) );
        add_action( 'admin_init', array( $this, 'page_init' ) );
    }

    /**
     * Add options page; 옵션 페이지 추가
     */
    public function add_plugin_page()
    {
        // This page will be under "Settings"; "설정" 페이지 아래에 표시됨
        add_options_page(
            'Settings Admin',
            'My Settings',  // "설정" > "My Settings" 페이지
            'manage_options',
            'my-setting-admin',
            array( $this, 'create_admin_page' )
        );
    }

    /**
     * Options page callback
     */
    public function create_admin_page()
    {
        // Set class property; 클래스 속성 설정
        $this->options = get_option( 'my_option_name' );
        ?>
        <div class="wrap">
            <h1>My Settings</h1>
            <form method="post" action="options.php">
            <?php
                // This prints out all hidden setting fields
                settings_fields( 'my_option_group' );
                do_settings_sections( 'my-setting-admin' );
                submit_button();
            ?>
            </form>
        </div>
        <?php
    }

    /**
     * Register and add settings; 설정 등록 및 추가
     */
    public function page_init()
    {
        register_setting(
            'my_option_group', // Option group; 옵션 그룹
            'my_option_name', // Option name; 옵션명
            array( $this, 'sanitize' ) // Sanitize
        );

        add_settings_section(
            'setting_section_id', // ID
            'My Custom Settings', // Title, 옵션 페이지에 표시되는 타이틀
            array( $this, 'print_section_info' ), // Callback
            'my-setting-admin' // Page
        );

        add_settings_field(
            'id_number', // ID
            'ID Number', // Title
            array( $this, 'id_number_callback' ), // Callback
            'my-setting-admin', // Page
            'setting_section_id' // Section
        );

        add_settings_field(
            'title',
            'Title',
            array( $this, 'title_callback' ),
            'my-setting-admin',
            'setting_section_id'
        );
    }

    /**
     * Sanitize each setting field as needed
     *
     * @param array $input Contains all settings fields as array keys
     */
    public function sanitize( $input )
    {
        $new_input = array();
        if( isset( $input['id_number'] ) )
            $new_input['id_number'] = absint( $input['id_number'] );

        if( isset( $input['title'] ) )
            $new_input['title'] = sanitize_text_field( $input['title'] );

        return $new_input;
    }

    /**
     * Print the Section text
     */
    public function print_section_info()
    {
        print 'Enter your settings below:'; // 옵션 페이지에 표시되는 문구. 예: '아래에 설정을 입력하세요'
    }

    /**
     * Get the settings option array and print one of its values
     */
    public function id_number_callback()
    {
        printf(
            '<input type="text" id="id_number" name="my_option_name[id_number]" value="%s" />',
            isset( $this->options['id_number'] ) ? esc_attr( $this->options['id_number']) : ''
        );
    }

    /**
     * Get the settings option array and print one of its values
     */
    public function title_callback()
    {
        printf(
            '<input type="text" id="title" name="my_option_name[title]" value="%s" />',
            isset( $this->options['title'] ) ? esc_attr( $this->options['title']) : ''
        );
    }
}

if( is_admin() )
    $my_settings_page = new MySettingsPage();
위의 코드를 사용 중인 테마의 함수 파일에 추가하면 ID Number와 Title이라는 두 필드를 설정 > My Settings 페이지에서 입력할 수 옵션 페이지가 알림판에 추가됩니다. (차일드 테마를 만들어서 작업하도록 합니다. 그렇지 않으면 테마가 업데이트될 경우 수정 사항이 사라지게 됩니다.)
만약 추가로 필드를 추가하고 싶다면 다음 부분을 찾아서 그대로 복사하여 그 아래에 붙여넣은 다음 적절히 값을 변경하면 됩니다.
  add_settings_field(
            'title',
            'Title',
            array( $this, 'title_callback' ),
            'my-setting-admin',
            'setting_section_id'
        );
그리고 아래의 섹션에서도 비슷한 방법으로 새로 추가하는 항목을 추가해주어야 합니다. 가령, 전화번호를 받는 항목을 텍스트 필드로 추가하는 경우 다음과 같은 세 가지 코드 스니핏을 적절한 곳에 추가해주면 됩니다.
// Telephone
        add_settings_field(
            'telephone_number',
            'Telephone Number',
            array( $this, 'telephone_number_callback' ),
            'my-setting-admin',
            'setting_section_id'
        );

// return $new_input; 바로 위에 추가
 if( isset( $input['telephone_number'] ) )
            $new_input['telephone_number'] = sanitize_text_field( $input['telephone_number'] );

// public function title_callback() 아래에 추가

public function telephone_number_callback()
    {
        printf(
            '<input type="text" id="telephone_number" name="my_option_name[telephone_number]" value="%s" />',
            isset( $this->options['telephone_number'] ) ? esc_attr( $this->options['telephone_number']) : ''
        );
    }
그러면 다음과 같이 3가지 필드가 표시됩니다.
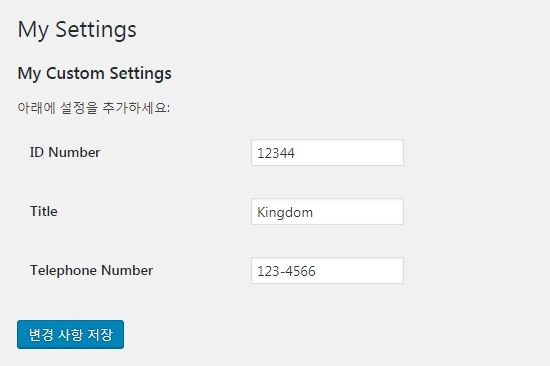
이제 값을 입력하여 저장하면 DB에 저장됩니다. 그러면 저장된 값을 어떻게 불러올 수 있을까요? 값을 불러오려면 다음과 같은 코드를 사용합니다.
$my_options = get_option( 'my_option_name' );
echo $my_options['title'];
echo $my_options['id_number'];
echo $my_options['telephone_number'];
이 방법을 사용하면 별도의 플러그인 없이 옵션 페이지를 워드프레스 관리자 페이지에 추가할 수 있습니다.
다른 방법으로 워드프레스 알림판 > 설정 > 일반에 사용자 입력 테스트 필드를 추가하는 방법이 다음 글에 설명되어 있습니다.
하나의 텍스트 필드를 "일반" 설정 페이지에 추가하려는 경우 이 방법을 사용하는 것이 더 간편합니다.
