Do you want to get a cheap and easy-to-use VPS (Virtual Private Server)? Then, Vultr, Linode or Digital Ocean will be a good option for you. Vultr provides users with a One-Click WordPress app. However, it includes PHP 5.6. If you want PHP 7.0 or 7.1, you will need to upgrade the PHP version manually.
You need some knowledge in Linux to run websites on Amazon AWS, DigitalOcean or Vultr. You may experience extreme stress due to server issues when using AWS or Vultr. Cloudways makes it easier to run WordPress websites with AWS, DigitalOcean, Linode or Vultr servers.
I prefer to installing WordPress on Ubuntu from scratch rather than using the One-Click WordPress app. You can create Snapshots with Vultr, which make thing easy. You can destroy current server and create a new server using a snapshot.
You can easily install PHP 7.0 or 7.1 and WordPress by following the steps described below.
Deploy a new server
If you do not have a Vultr account, you can create one at Vultr.com.
Choose a Server Location
First, select a Server Location. You can choose one from 15 locations.
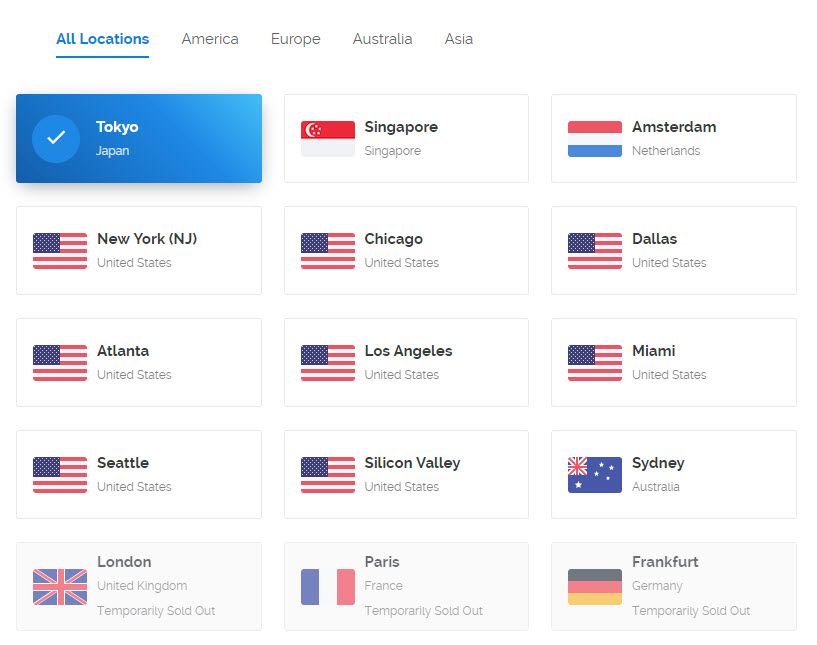
If you want to use the cheapest plan (USD2.5/month), please select "New York (NJ)." If you choose other location than "New York (NJ)," the $2.50/mo plan will be disabled, saying "Temporarily Sold Out."
Choose a Server Type
Next, you need to choose a Server Type.
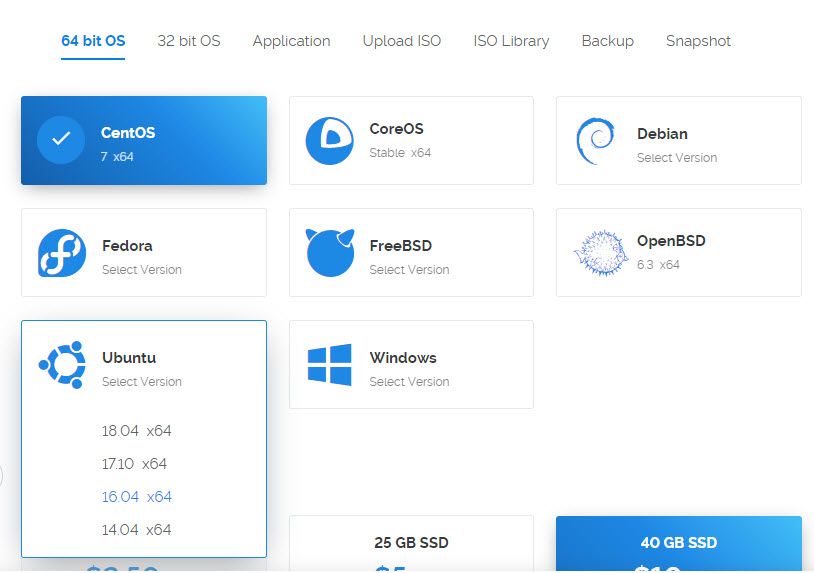
If you want, you can choose a Server Type from snapshots. I chose "Ubuntu 16.10 x64" as a test. However, you should choose "Ubuntu 16.04 LTS" instead of "16.10" to receive Long Term Support.
Choose a Server Size
Now, choose a Server Size.
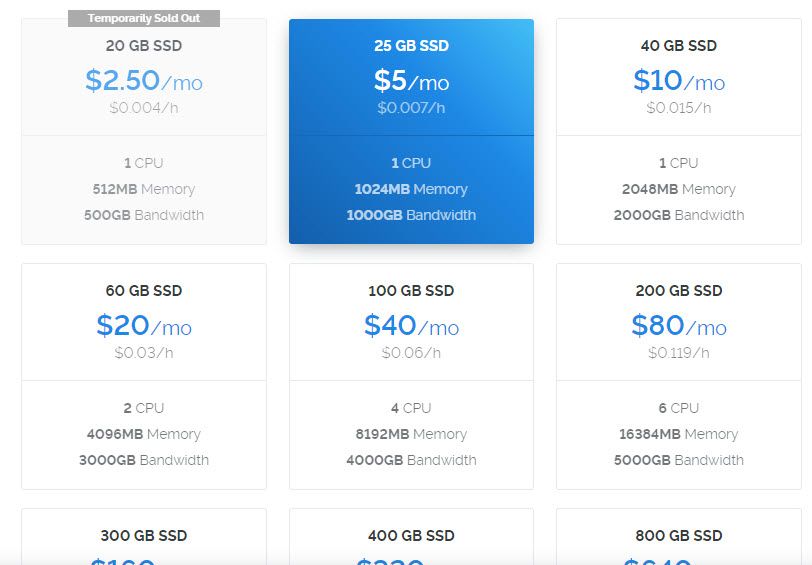
You can choose a plan from $2.5/mo. If this plan is not available, please check the Server Location. You might need to choose "New York (NJ)" to select the cheapest plan.
Now you can deploy a server. You can create SSH Keys which will help you to manage your server with ease.
Install WordPress on a LEMP Configuration
You need to log into SSH to perform the steps below. On Windows, please use putty.exe to log into SSH, which makes things easy. You can download it from https://www.chiark.greenend.org.uk/~sgtatham/putty/latest.html.
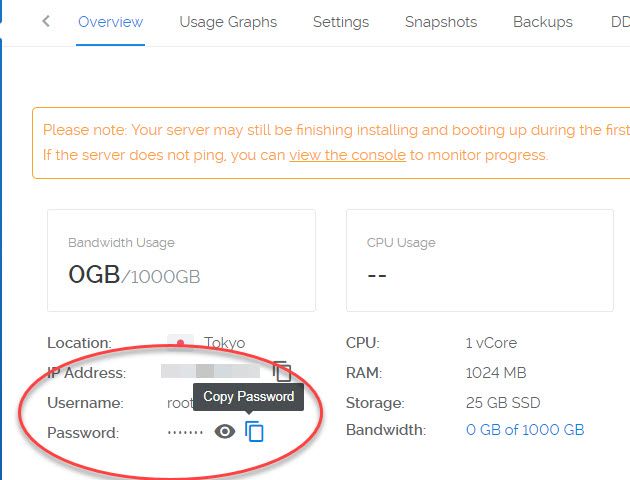
You can also use the console to log into your server. The root password for your server can be found under the detailed page of your sever.
Update existing packages
apt-get update && apt-get upgrade
Also it's important to update your server regularly for security.
Install and configure PHP 7.0
Since Ubuntu 16.04, PHP 7.0 has replaced PHP 5.x and become the default version of PHP in the official Ubuntu application repository. You can install and configure PHP 7.0 on your Ubuntu 16.04 or Ubuntu 16.10 system as follows. First of all, you can list all of the available PHP 7.0-related packages for review:
apt-cache pkgnames | grep php7.0
Then you can install the package your to-be-deployed application requires.
If you want to deploy your application based on the LEMP stack, you can install the following packages after installing Nginx:
sudo apt-get install -y nginx
sudo apt-get install -y php7.0 php7.0-fpm php7.0-cli php7.0-common php7.0-mbstring php7.0-gd php7.0-intl php7.0-xml php7.0-mysql php7.0-mcrypt php7.0-zip
You can choose to install Apache instead of Nginx. (However, in the section "Installing the WordPress files" below, I will describe how to install WordPress in the environment where Nginx is installed.)
sudo apt-get install -y apache2
sudo apt-get install -y php7.0 libapache2-mod-php7.0 php7.0-cli php7.0-common php7.0-mbstring php7.0-gd php7.0-intl php7.0-xml php7.0-mysql php7.0-mcrypt php7.0-zip
When the installation is complete, you can check the php version installed on your server:
php -v
The output will be like the following:
PHP 7.0.18-0ubuntu0.16.10.1 (cli) ( NTS )
Copyright (c) 1997-2017 The PHP Group
Zend Engine v3.0.0, Copyright (c) 1998-2017 Zend Technologies
with Zend OPcache v7.0.18-0ubuntu0.16.10.1, Copyright (c) 1999-2017, by Zend Technologies
The main config file of PHP 7.0 will be saved as /etc/php/7.0/apache2/php.ini (Apache) or /etc/php/7.0/fpm/php.ini (Nginx). You can use the nano text editor to modify relevant settings in that file.
sudo nano /etc/php/7.0/fpm/php.ini
I modified the following php settings:
- upload_max_filesize ==>200M
- post_max_size ==>64M
- memory_limit ==>256M
- max_execution_time ==> 300
- max_input_vars ==> 3000
I also changed ";cgi.fix_pathinfo=1" to "cgi.fix_pathinfo=0". (I am not sure whether it's needed or not. I just followed Vultr documentation on installing PHP 5.5.)
For security, I made changes as follows:
Changed file_uploads = On to file_uploads = Off(To upload images properly, this option should be set to On)- Changed sql.safe_mode=Off to sql.safe_mode=On
- Set allow_url_fopen to Off
- Added "register_globals = Off" at the end of the php.ini file
Remember to restart Apache or Nginx if you make any changes to that file or any other PHP config files:
sudo systemctl restart apache2.service
or:
sudo systemctl restart nginx.service php7.0-fpm.service
Install and configure PHP 7.1
If you want to install PHP 7.1 instead of PHP 7.0, a convenient method is to use the PPA (Personal Package Archives) repository.
First of all, you need to add specified PPA to the system apt repository:
sudo apt-get install -y python-software-properties
sudo add-apt-repository -y ppa:ondrej/php
sudo apt-get update -y
(Actually, python-software-properties was already installed, you can ignore it.)
Then you can list all of the available PHP 7.1-related packages for review:
apt-cache pkgnames | grep php7.1
From now on, you can install and configure PHP 7.1 in the same fashion as mentioned in the section about PHP 7.0 above. Basically, replacing 7.0 with 7.1 in relevant commands will get your job done.
Install MySQL
To store and manage databases, you need to install MySQL. You can easily install it by typing the following command in the console:
sudo apt-get install mysql-server
During the installation process, you will be asked to set a root password for MySQL. Once you have set the root password, you will have to tell MySQL to generate the directory structure where it will store databases.
sudo mysql_install_db
Let's finish it up by running a security script that will modify some default insecurities.
sudo mysql_secure_installation
Just type the MySQL root password and type n if you don’t want to change it. After that, type y to every question.
You can check the MySQL version installed on your server by entering the following command:
mysql -V
The output will be like the following:
mysql Ver 14.14 Distrib 5.7.18, for Linux (x86_64) using EditLine wrapper
Set Timezone (optional)
By default, the timezone of your server is UTC (also known as Greenwich Mean Time) but this can be changed. It may be better to use the same timezone which a majority of your users are located in, or that you live in to make log file timestamps more sensible.
sudo dpkg-reconfigure tzdata
The following popup will appear for you to set your timezone:

At this point, your LEMP server is up and running.
Configuring Nginx to serve WordPress
Now start your WordPress installation by creating an Nginx server block for your site.
sudo nano /etc/nginx/sites-available/wordpress
Please copy the code below and then pasted it into the newly created file (/etc/nginx/sites-available/wordpress) in the text editor:
server {
listen 80;

root /var/www/wordpress;
index index.php index.html index.htm;

server_name domain.com;

error_page 404 /404.html;

error_page 500 502 503 504 /50x.html;
location = /50x.html {
root /usr/share/nginx/html;
}
location / {
# try_files $uri $uri/ =404;
try_files $uri $uri/ /index.php?q=$uri&$args;
}

location ~ \.php$ {
try_files $uri =404;
fastcgi_split_path_info ^(.+\.php)(/.+)$;
fastcgi_pass unix:/var/run/php/php7.0-fpm.sock;
fastcgi_index index.php;
fastcgi_param SCRIPT_FILENAME $document_root$fastcgi_script_name;
include fastcgi_params;
}

location = /favicon.ico {
access_log off;
log_not_found off;
expires max;
}
location = /robots.txt {
access_log off;
log_not_found off;
}

# Cache Static Files For As Long As Possible
location ~*
\.(ogg|ogv|svg|svgz|eot|otf|woff|mp4|ttf|css|rss|atom|js|jpg|jpeg|gif|png|ico|zip|tgz|gz|rar|bz2|doc|xls|exe|ppt|tar|mid|midi|wav|bmp|rtf)$
{
access_log off;
log_not_found off;
expires max;
}
# Security Settings For Better Privacy Deny Hidden Files
location ~ /\. {
deny all;
access_log off;
log_not_found off;
}
# Return 403 Forbidden For readme.(txt|html) or license.(txt|html)
if ($request_uri ~* "^.+(readme|license)\.(txt|html)$") {
return 403;
}
# Disallow PHP In Upload Folder
location /wp-content/uploads/ {
location ~ \.php$ {
deny all;
}
}
}
You can change the root directory as you wish. In this case, the root directory is "/var/www/wordpress."
Please modify "server_name domain.com;" to reflect your actual domain name, such as:
server_name exmple.com www.example.com;
This is a well tuned WordPress configuration file with permalinks support. Save (Ctrl+O) and close the file (Ctrl+X). Let's enable the server block by symlinking:
sudo ln -s /etc/nginx/sites-available/wordpress /etc/nginx/sites-enabled/wordpress
Next, delete the Nginx default server block:
sudo rm /etc/nginx/sites-enabled/default
Now, let's tune the main Nginx configuration file:
sudo nano /etc/nginx/nginx.conf
Make sure that the number of worker processes is equal to the number of cores in your instance.
user www-data;
worker_processes 1;
pid /run/nginx.pid;
Add use epoll; to the events block.
events {
worker_connections 1024;
multi_accept on;
use epoll;
}
I also changed "worker_connections" (whose default value is 768) to 1024 by referring to a Digital Ocean document.
Add client_max_body_size and server_tokens off directive. Please set keepalive_timeout to 30 seconds.
##
# Basic Settings
##

sendfile on;
tcp_nopush on;
tcp_nodelay on;
keepalive_timeout 30;
types_hash_max_size 2048;
server_tokens off;
client_max_body_size 100m;


# server_names_hash_bucket_size 64;
# server_name_in_redirect off;

include /etc/nginx/mime.types;
default_type application/octet-stream;
Make sure that the whole Gzip settings block looks like this:
##
# Gzip Settings
##
gzip on;
gzip_disable "msie6";

gzip_vary on;
gzip_proxied any;
gzip_comp_level 6;
gzip_buffers 16 8k;
gzip_http_version 1.1;
gzip_types text/plain text/css application/json application/x-javascript text/xml application/xml application/xml+rss text/javascript;
Save the changes (Ctrl+O) and close the file (Ctrl+X). And then restart the server:
sudo service nginx restart
Setting up the MySQL database
In this step, you'll create the database user and tables. Connect to SSH and log into the MySQL shell:
mysql -u root -p
You need to enter your MySQL root password. You will need to create a WordPress database, along with a user in the database. First, let's make the database (feel free to give it whatever name you like):
CREATE DATABASE yourdb;
CREATE USER 'dbuser'@'localhost' IDENTIFIED BY 'yourpassword';
GRANT ALL PRIVILEGES ON yourdb.* TO 'dbuser'@'localhost';
FLUSH PRIVILEGES;
where "yourdb" is the database you want to create, "dbuser" is a user in the database, and "yourpassword" is the password for the user.
Exit the MySQL shell:
exit
Installing the WordPress files
Now it's almost there! Let's proceed to installing WordPress.
First create and navigate to the site root directory:
mkdir /var/www/
cd /var/www/
Now, download the latest version of WordPress:
wget http://wordpress.org/latest.tar.gz
Extract it from the archive using the following command:
tar -xzvf latest.tar.gz
Give the permissions of /var/www/wordpress to www-data user. It will allow future automatic updating of WordPress plugins and file editing with SFTP.
sudo chown -R www-data:www-data wordpress/
sudo usermod -a -G www-data www-data
Finally, everything is done.
If you connect to your domain name or your server IP address, the famous WordPress installation screen will appear. If an error message (such as, "404 not found nginx"), you can check error logs:
sudo tail -n 20 /var/log/nginx/error.log
It's possible to migrate your existing WordPress site using normal methods such as using the Duplicator plugin or manually. You can consider installing phpMyAdmin to manage your database. Just upload the phpMyAdmin files/folders to your server using sFTP. (You might need to take some measures to prevent unauthorized access to phpMyAdmin.)
Wrapping up
There are many documents about installing WordPress on Ubuntu. However, it's not easy to follow such documents for beginners. I referred to documents from Vultr and Digital Ocean.
If you have problems installing or managing your server in an unmanaged VPS (such as Vultr, Digital Ocean or Linode), it will be better to use managed VPS or a shared hosting such as Siteground. Personally, I have used Bluehost, iPage, GoDaddy and Siteground. Among them, I felt Siteground's shared hosting is stable and good in performance. This blog is currently hosted with Bluehost VPS. Bluehost VPS is also stable and offers good persomance. However, naturally it's relatively expensive than shared hosting plans. I consider changing it to Siteground when the hosting period is expired.
Just for your reference: You can get a free one to two month DigitalOcean trial by singing up through the following referral link which gives you $10 credit for free:
If you got the following error:
please set file_uploads to On.
And adjust the set post_max_size value to be equal or higher than upload_max_filesize.
Please also note that allow_url_fopen might need to be set to "On" for some themes or plugins to work properly.