Introduction
WordPress provides options to add menus to various locations depending on themes. However, you might also want to insert a menu navigation to a new location. For example, there is no top navigation in the Iconic One them used in this blog. I added a top navigation as shown in the figure below. (The menu can also be added to other position.)

For this, we first need to visit the WordPress Codex site to learn how to add navigations in WordPress. If we visit Navigation Menus page, we can obtain the information we need.
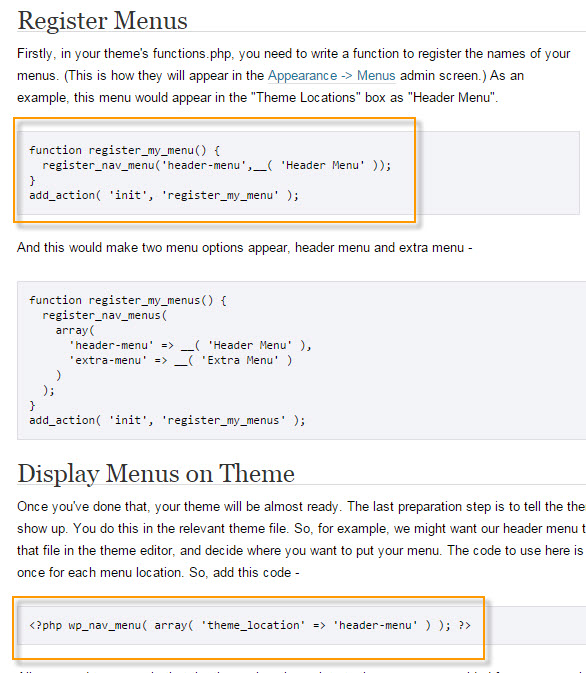
Register a menu
First, please register a menu as follows. Add a code snippet in the functions.php of your current theme.
function register_my_menu() {
  register_nav_menu('header-menu',__( 'Header Menu' ));
}
add_action( 'init', 'register_my_menu' );
Add a code to the Header.php file
Now, we need to add a menu to a desired location. Please insert a code snippet like the following to the header section of the Header.php file.
<?php wp_nav_menu( array( 'theme_location' => 'header-menu' ) ); ?>
I placed it just before <header id="masthead" class="site-header" role="banner">.
You can wrap the above code with a "div" element or you can add the following elements within "array."
'theme_location'  => '',
'menu'            => '',
'container'       => 'div',
'container_class' => '',
'container_id'    => '',
'menu_class'      => 'menu',
'menu_id'         => '',
'echo'            => true,
'fallback_cb'     => 'wp_page_menu',
'before'          => '',
'after'           => '',
'link_before'     => '',
'link_after'      => '',
'items_wrap'      => '<ul id="%1$s" class="%2$s">%3$s</ul>',
'depth'           => 0,
'walker'          => ''
Add menu entries
Now you will find out the newly added menu location under Appearance > Menu/strong>.
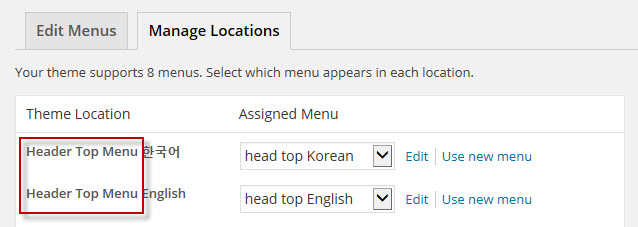
(Two custom menus appear in the sample figure above. It's because Polylang, a multilingual plugin, is used.)
After creating a menu and specifying its menu location to the newly added menu, however, the menu will not appear as expected. As a last step, we need to style the menu with CSS.
Style the menu using CSS
I placed the following code snippets in the stylesheet file (style.css). You can access the stylesheet file of your theme by clicking "Appearance > Editor" in the Dashboard.
/* Header Menu Style */
#custom_header_menu {
margin-top: -17px;
float: right;
margin-right: 1px;
}
#custom_header_menu ul {
	margin: 0; padding: 0;
	list-style-type: none;
	list-style-image: none;
line-height: 10px!important;
	}
#custom_header_menu li {
	display: inline;
	padding: 0px 7px 0px 7px;
	border-right: 1px solid #BDBDBD;

	}

#custom_header_menu li:first-child {
	display: inline;
	padding: 0px 7px 0px 7px;
	border-left: 1px solid #BDBDBD;

	}

#custom_header_menu li a {
	text-decoration:none;
	font-size: 12px;
	color: grey;

	}
#custom_header_menu li a:hover {
	color: #08088A;
	}
Please modify the above code as you wish. Or you might use your own code.
Now a new custom menu is added on the top of the blog. You can also add a menu to a location you prefer including a footer section with this method.
