들어가며
WooCommerce 2.1부터 "내 계정(My Account)" 페이지의 등록 양식을 커스터마이징할 수 있습니다. 아래의 내용은 Woothemes Support 사이트의 내용을 옮긴 것입니다.
"내 계정" 페이지의 등록 폼에 필드를 추가하려면 먼저 "등록"이 가능하도록 설정해야 합니다.
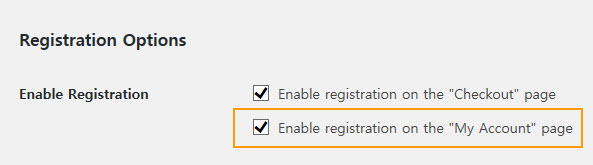
워드프레스 대시보드에서 우커머스 > 설정 페이지로 이동한 후에 계정(Accounts) 탭을 선택합니다. 그런 다음 Registration Options(등록 옵션)의 "Enable Registration(등록 활성화)"에서 Enable registration on the "My Account" page를 체크합니다.
기본적으로 "내 계정" 페이지는 다음과 같이 표시됩니다.
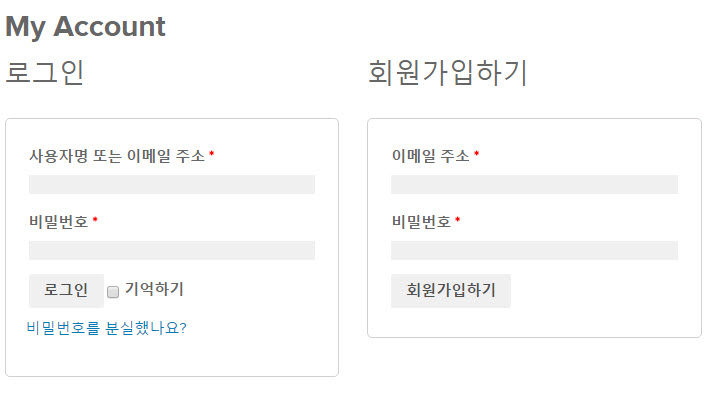
위의 그림과 같이 "이메일 주소"와 "비밀번호"만 표시됩니다.
새 필드 추가하기
"내 계정"에서 회원가입 폼에는 기본적으로 두 개의 필드만 있어서 쉽게 회원가입이 가능하도록 되어 있습니다. 추가 필드를 지정하려면 다음 액션을 사용할 수 있습니다.
- woocommerce_register_form_start - "이메일 주소" 필드 뒤에 표시됩니다.
- woocommerce_register_form - "비밀번호" 필드 뒤에 표시됩니다.
예를 들어, 다음과 같은 코드를 사용하여 "이름", "성", "전화번호" 필드를 추가할 수 있습니다.
/**
* Add new register fields for WooCommerce registration.
* 우커머스 등록 폼에 새로운 필드 추가
*
* @return string Register fields HTML.
*/
function wooc_extra_register_fields() {
?>

<p class="form-row form-row-first">
<label for="reg_billing_first_name"><?php _e( 'First name', 'woocommerce' ); ?> <span class="required">*</span></label>
<input type="text" class="input-text" name="billing_first_name" id="reg_billing_first_name" value="<?php if ( ! empty( $_POST['billing_first_name'] ) ) esc_attr_e( $_POST['billing_first_name'] ); ?>" />
</p>

<p class="form-row form-row-last">
<label for="reg_billing_last_name"><?php _e( 'Last name', 'woocommerce' ); ?> <span class="required">*</span></label>
<input type="text" class="input-text" name="billing_last_name" id="reg_billing_last_name" value="<?php if ( ! empty( $_POST['billing_last_name'] ) ) esc_attr_e( $_POST['billing_last_name'] ); ?>" />
</p>

<div class="clear"></div>

<p class="form-row form-row-wide">
<label for="reg_billing_phone"><?php _e( 'Phone', 'woocommerce' ); ?> <span class="required">*</span></label>
<input type="text" class="input-text" name="billing_phone" id="reg_billing_phone" value="<?php if ( ! empty( $_POST['billing_phone'] ) ) esc_attr_e( $_POST['billing_phone'] ); ?>" />
</p>

<?php
}

add_action( 'woocommerce_register_form_start', 'wooc_extra_register_fields' );
참고로 "billing_*"로 필드를 사용하여 나중에 우커머스에서 고객 계정의 필드와 연결시킬 수 있습니다.
다음과 같은 필드를 사용할 수 있습니다.
- billing_first_name
- billing_last_name
- billing_company
- billing_address_1
- billing_address_2
- billing_city
- billing_postcode
- billing_country
- billing_state
- billing_email
- billing_phone
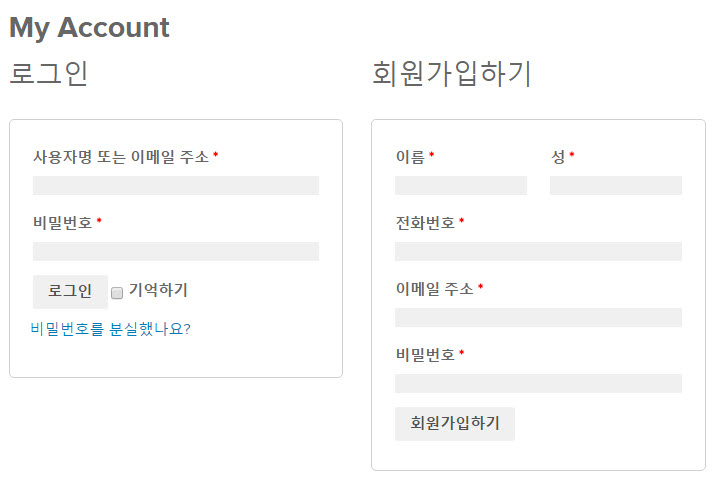
위의 코드를 사용 중인 워드프레스 함수 파일에 추가하면 다음과 같이 바뀝니다.
사용자 정의 필드 유효성 검사
사용자가 모든 필드를 채우도록 유효성 검사를 하는 것이 중요합니다. 이 기능을 위해 woocommerce_register_post 액션을 사용할 수 있습니다.
다음은 유효성 검사 예시입니다. (참고로 유효성 검사 코드를 넣지 않아도 필드를 채우지 않으면 오류 메시지가 표시되는 것 같습니다. 이 코드를 사용하기 전에 테스트해보시기 바랍니다.)
/**
* Validate the extra register fields.
* 추가 등록 필드 유효성 검사
*
* @param  string $username          Current username 현재 사용자명.
* @param  string $email             Current email 현재 이메일.
* @param  object $validation_errors WP_Error object.
*
* @return void
*/
function wooc_validate_extra_register_fields( $username, $email, $validation_errors ) {
if ( isset( $_POST['billing_first_name'] ) && empty( $_POST['billing_first_name'] ) ) {
$validation_errors->add( 'billing_first_name_error', __( '<strong>Error</strong>: First name is required!', 'woocommerce' ) );
}

if ( isset( $_POST['billing_last_name'] ) && empty( $_POST['billing_last_name'] ) ) {
$validation_errors->add( 'billing_last_name_error', __( '<strong>Error</strong>: Last name is required!.', 'woocommerce' ) );
}
if ( isset( $_POST['billing_phone'] ) && empty( $_POST['billing_phone'] ) ) {
$validation_errors->add( 'billing_phone_error', __( '<strong>Error</strong>: Phone is required!.', 'woocommerce' ) );
}
}

add_action( 'woocommerce_register_post', 'wooc_validate_extra_register_fields', 10, 3 );
사용자 정의 필드 저장하기
이제 마지막으로 커스텀 필드를 데이터베이스(DB)에 저장해야 합니다.
사용자 프로필에 커스텀 필드를 저장해야 하며 이 기능은 woocommerce_created_customer 액션을 사용하도록 합니다.
/**
* Save the extra register fields.
* 추가 등록 필드 저장하기
*
* @param  int  $customer_id Current customer ID 현재 고객 ID.
*
* @return void
*/
function wooc_save_extra_register_fields( $customer_id ) {
if ( isset( $_POST['billing_first_name'] ) ) {
// WordPress default first name field 워드프레스 기본 사용자 '이름' 필드.
update_user_meta( $customer_id, 'first_name', sanitize_text_field( $_POST['billing_first_name'] ) );

// WooCommerce billing first name 우커머스 청구지 사용자 '이름'.
update_user_meta( $customer_id, 'billing_first_name', sanitize_text_field( $_POST['billing_first_name'] ) );
}

if ( isset( $_POST['billing_last_name'] ) ) {
// WordPress default last name field 워드프레스 기본 사용자 '성' 필드.
update_user_meta( $customer_id, 'last_name', sanitize_text_field( $_POST['billing_last_name'] ) );

// WooCommerce billing last name 우커머스 청구지 사용자 '성'.
update_user_meta( $customer_id, 'billing_last_name', sanitize_text_field( $_POST['billing_last_name'] ) );
}

if ( isset( $_POST['billing_phone'] ) ) {
// WooCommerce billing phone 우커머스 청구지 전화번호
update_user_meta( $customer_id, 'billing_phone', sanitize_text_field( $_POST['billing_phone'] ) );
}
}

add_action( 'woocommerce_created_customer', 'wooc_save_extra_register_fields' );
이제 모든 필드가 정상적으로 저장되고 원하는 방식대로 제대로 작동합니다.
참고로 WP-Members를 활성화한 경우 예상되로 작동하지 않을 수 있으니 WP-Members 플러그인을 비활성화하도록 합니다. 멤버쉽 플러그인을 사용해야 하는 다른 멤버쉽 플러그인이나 우커머스 전용 멤버쉽 플러그인(예: WooCommerce Membership)의 사용을 고려하시기 바랍니다.
이 css는 어디에 복사해서 붙여넣으면 되는거죠?
/**
* Add new register fields for WooCommerce registration.
* 우커머스 등록 폼에 새로운 필드 추가
*
* @return string Register fields HTML.
*/
function wooc_extra_register_fields() {
?>
*
<input type="text" class="input-text" name="billing_first_name" id="reg_billing_first_name" value="" />
*
<input type="text" class="input-text" name="billing_last_name" id="reg_billing_last_name" value="" />
*
<input type="text" class="input-text" name="billing_phone" id="reg_billing_phone" value="" />
<?php
}
add_action( 'woocommerce_register_form_start', 'wooc_extra_register_fields' );
안녕하세요?
코드는 테마의 함수 파일에 추가하면 됩니다.
https://www.thewordcracker.com/basic/how-to-add-custom-codes-to-wordpress/
참고로 위의 글은 작성된지 조금 오래되었네요. 최신 우커머스와 워드프레스에서 제대로 작동하지 않을 가능성도 있습니다.